If you live in the north east, you know it’s been a brutal winter. So after the snow finally melted we were, like everybody else, relieved. Except when one day I am running down the porch to go to work and the concrete stairs just crumble at my feet. Uh-oh. I smell a lawsuit. Especially because my town has a ‘no street mailbox rule’ meaning every mail person has to walk all the way up my driveway up the porch to leave the mail at a box by the door.
So In the spirit of embracing the DIY lifestyle and trying to accomplish all of the to-do list on our own, my boyfriend and I made a date for the upcoming weekend to repair it.
We prepped ourselves by watching a YouTube video and reading a few articles. It seemed simple. My dad even lent us the supplies, so it was virtually free to repair them ourselves. And, it was pretty easy. Not saying we did a stellar job, but it was easy enough to do ourselves.
On a side note, I apologize for the lack of pictures… BUT word to the wise: don’t mix iphones and cement, it will end in tragedy.

Here’s the tools.
1. A chisel, or an old screwdriver which will pretty much achieve the same result
2.Patch cement (PATCH cement)
3. A brick trowel or two
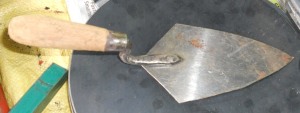
Which looks something like this.
4. An empty pail
5. Water
6. A sponge (car wash sponge is ideal)
Here’s the steps.
1. Take out (if they are still loosely lodged in there) the loose bricks
2. Clean off the bricks. Take a chisel and just beat the crap out of the brick until the excess cement comes off. It’s pretty stress relieving after a while.
3. Get yourself a pail (or if you are us, an empty cat litter container) and mix the cement by following the directions on the bag (usually just add some water and mix, pretty simple.)
4. Lay the bricks out and devise a plan to where they are going. Try to put them back where they were. We lined them up in order so we didn’t get confused.
5. Lather up the freshly cleaned bricks with concrete. I mean lather them up. This was Berto’s job, and he pretty much just covered those babies with cement all over the bottom sides (not the part that will be visible, just the part you are trying to stick). Put some more cement where you are going to lay the brick. Then when you place the brick in, you goop more into the seams. Really push it in there.
OPTIONAL STEP: When you run out of cement because you are an amateur and have to run to the hardware store… don’t accidentally buy the wrong cement. Seriously, buy PATCH cement and not normal cement because normal cement has rocks in it and it’s not for this type of job. Buy PATCH cement. We learned our lesson, the normal cement works but it’s definitely not as pretty, or the same color as patch cement.
6. Let them dry. Go binge watch on Netflix as a reward or something.
7. Clean off the bricks. Maybe this should be done before you let them dry fully, because once it’s dried, it’s pretty hard to get the cement off of there. See finished product below.
Finished product.
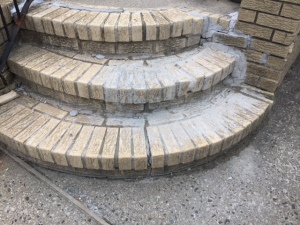
You can say it, go on. It looks like crap. Hey, this is what DIY is really like. you win some, you lose some. At least they are sturdy again and we don’t have to worry about the mail person slipping and breaking their neck.
HINDSIGHT:
1. Pick a sunny, warm day to do this type of work. It was cloudy and chilly when we did it and it made us rush and takes longer to dry.
2. If this is a permanent fix, put some serious effort into cleaning the brick once you are done. Or else it’s going to look like an amateur job. Once again, see above.
3. Buy plenty of patch cement in advance so you don’t have to worry about running out to buy more and having two different colors of cement (I seriously can’t stress this enough).
4. Mix a little at a time, there is really no good way to dispose of the leftovers, expect by chucking the pail you used to mix it in.
5. If you seriously have few handy skills and need this job to be just right, consult a professional. After the process we found out it would have only cost from $50-$100 to have it fixed, and if we had to buy all the tools for the job we would have broke even.
6. If you seriously plan on doing it yourself, please don’t use the above as your only guide. As a disclaimer, I claim no responsibility if your brick stairs come out anything like mine.. or worse!
Happy brick laying

!